1000 Lumen Trionic LED Front Light

This manual both shows how you attach the light holder and the light on a Walker (left column below) and also how you attach them on a Veloped (right column below).

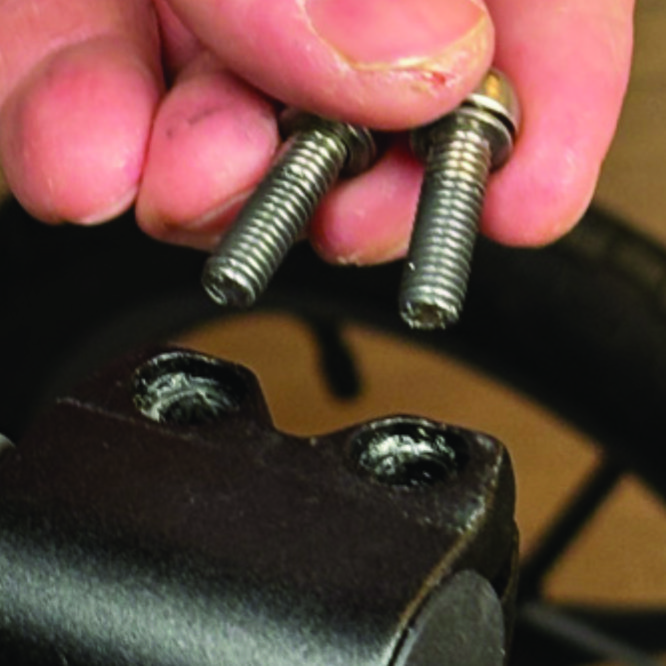
In the left-hand photo, A shows the holder attachment parts for a Walker (2 screws + 2 washers). B shows the holder attachment parts for a Veloped (1 screw + 1 knurled nut + 1 nut).

1000 Lumen Trionic LED Front Light

Attaching the Light Holder

Instructions for a Walker

On top of the black semi-vertical tube, locate the two screws that clamp the grip tube, situated in front of the brake lever.
A1. On top of the black semi-vertical tube, locate the two screws that clamp the grip tube, situated in front of the brake lever.
Loosen both screws with the 5mm allen key included with the LED light.
A2. Loosen both screws with the 5mm allen key included with the LED light.
Remove the two screws from the grip clamp.
A3. Remove the two screws from the grip clamp.
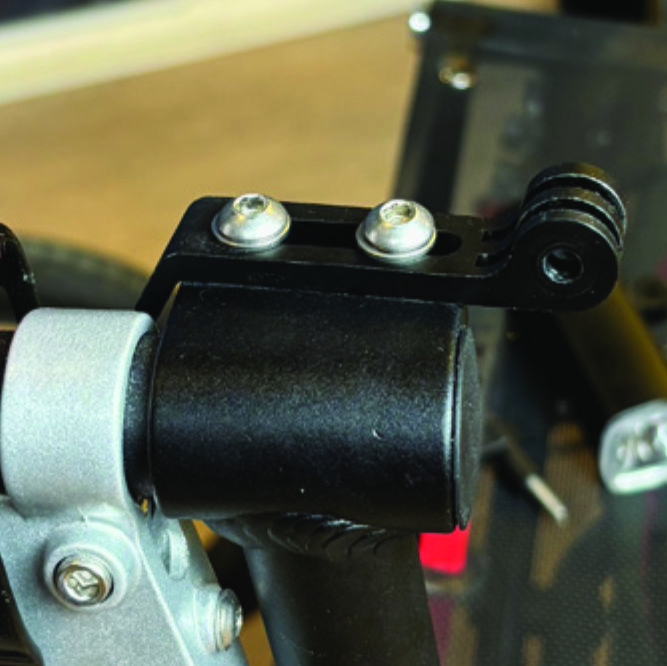
Place the light holder on top of the grip clamp, with its circular and slotted light attachment pointing forwards and upwards. Enter the two screws with washers into the holes of the clamp.
A4. Place the light holder on top of the grip clamp, with its circular and slotted light attachment pointing forwards and upwards. Enter the two screws with washers into the holes of the clamp.
Tighten the two screws with the 5mm allen key. NOTE: It is important that you tighten the screws properly as they secure the grip tube with its rubber grip and brake lever.
A5. Tighten the two screws with the 5mm allen key. NOTE: It is important that you tighten the screws properly as they secure the grip tube with its rubber grip and brake lever.

Instructions for a Veloped

Locate the screw at the center folding hinge of the U-shaped grip bar of the Veloped. Unscrew the screw with the included 4mm allen key and remove it.
A1. Locate the screw at the center folding hinge of the U-shaped grip bar of the Veloped. Unscrew the screw with the included 4mm allen key and remove it.
Replace the old screw with the longer screw included with the LED light. Attach the longer screw to the hinge and tighten it with the 4mm allen key.
B2. Replace the old screw with the longer screw included with the LED light. Attach the longer screw to the hinge and tighten it with the 4mm allen key.
Attach the short angled end of the light holder to the lower end of the screw, on the downside of the U-shaped grip bar. The holder should point downwards. Fasten the holder with one washer and the knurled nut that you tighten with your fingers.
B3. Attach the short angled end of the light holder to the lower end of the screw, on the downside of the U-shaped grip bar. The holder should point downwards. Fasten the holder with one washer and the knurled nut that you tighten with your fingers.
For a more secure holder attachment, avoiding the holder to unintentionally turn sideways, replace the knurled nut with the included stainless steel nut and tighten it with a 10mm spanner.
B4. For a more secure holder attachment, avoiding the holder to unintentionally turn sideways, replace the knurled nut with the included stainless steel nut and tighten it with a 10mm spanner.
This photo shows the light holder as correctly attached.
B5. This photo shows the light holder as correctly attached.

Attaching the LED Light to the Holder

Instructions for a Walker

Identify the circular front end of the light holder, with two slots for attaching the light.
A6. Identify the circular front end of the light holder, with two slots for attaching the light.
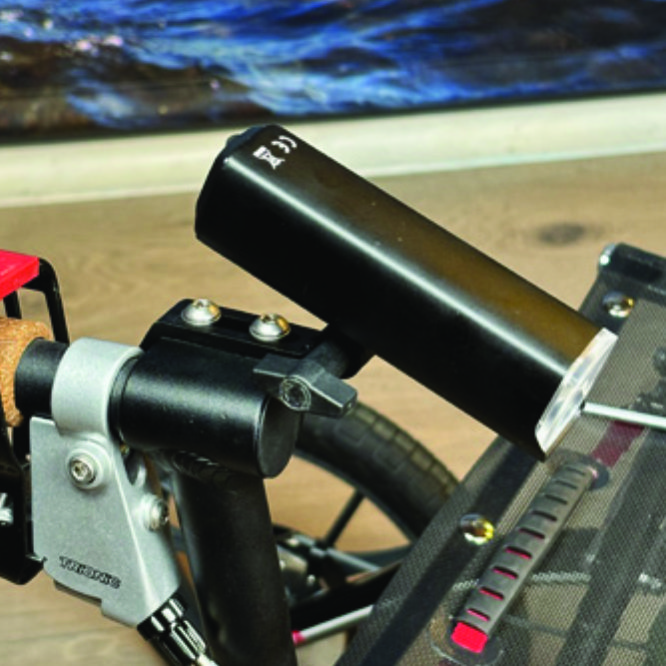
Push the slotted bracket of the light into the slots of the holder and make sure they are aligned. Seen in the traveling direction of the Walker, enter the included wingnut from the left and tighten it.
A7. Push the slotted bracket of the light into the slots of the holder and make sure they are aligned. Seen in the traveling direction of the Walker, enter the included wingnut from the left and tighten it.

Instructions for a Veloped

Locate the screw at the center folding hinge of the U-shaped grip bar of the Veloped. Unscrew the screw with the included 4mm allen key and remove it.
B6. Locate the screw at the center folding hinge of the U-shaped grip bar of the Veloped. Unscrew the screw with the included 4mm allen key and remove it.
Identify the circular front end of the light holder, with two slots for attaching the light.
B7. Identify the circular front end of the light holder, with two slots for attaching the light.

Instructions for Use

Overview

Caution

Caution

Battery Performance

Battery performance is significantly affected by temperature variations: •Low Temperature: At 0°C, capacity decreases by 5–10%, reducing operation time by 50%. At -20°C, capacity drops by 30%, potentially shortening operation time by 70%. Performance returns to normal when the temperature rises to 20°C. •Self-Discharge Rate: At room temperature, the battery loses about 1% of its capacity per day. When stored at 40°C, the self-discharge rate increases, leading to a loss of approximately 5% of capacity per day. To maintain optimal battery performance, avoid exposing it to extreme temperatures and store it in a cool, dry place. If you do not use the battery for a long time be sure to recharge the battery every 3 months.

Safe Mode

When the battery is low, the light will automatically switch to a 50-lumen high-beam safe mode, providing an additional 30 minutes of operation.

How to operate the light

Press and hold the switch for 2 seconds to turn the light on or off. Click once to cycle through modes, and double-click to enable ultra-bright mode (1000 lm).

The package contains

Charging And Powerbank

Product Reviews    

  • Schwalbe tube 14”…

    Goods received and installed in the shortest possible time. Everything is perfect again.…

    Schwalbe Tube 14 inch
    by Josef Koller
  • It's got me, my dogs &my legs out again…

    Love it, kerbs no problem, hills no problem. I have had trouble with a kissing gate!! Thought I might be stuck in it, collapsed it and took it through like an upside down tripod. Have fixed 2 cable ties 4 cane holder.…

  • Also suitable for gardening…

    I am delighted with my new rollator. With this support, I can finally pursue my beloved gardening.…

  • Excellent walker…

    Lovely walker, beautifully made. Wonderful for going up and down kerbs. Try to persevere with it but need an armrest walker to take some of the weight off my legs due to MS. I was advised you didn't do these but wanted a walker I could use on roug…

  • Recieved my Trionic Veloped Trek……

    Recieved my trionic veloped trek yesterday, its a bit of a beast compared to usuall rollators but so much easier and more comfortable to use. Today i went on a 2hr walk with my old dog(who approves of the front basket when his little legs are tired),…

  • Both Trionic buys have been absolute godsends.…

    Just a few words of praise for my Trionic Walker.

    I fell Friday week ago and broke my hip. I am 67 and have Post Polio Syndrome. I own both Walker and Veloped but following surgery and half hip replacement my Walker has really come into its own. M…

  • High quality product…

    Technically sophisticated. Excellent workmanship. Stable and safe to use. Perfect for walking on dirt roads and cobblestone streets. Also, very suitable for patients with balance disorders.

    The only point that, in my opinion, could be improved is …

  • A First Class Product…

    My wife has just come out of hospital after suffering a very bad attack of vertigo. While in hospital, it was also discovered that my wife has suffered from cerebral palsy since birth. This now explains why she has such poor balance and has always re…

  • Excellent product…

    This has been a life-changer for me. I suffer from a back problem, which seriously restricted my walking. Using the Trionic Trek I can comfortably walk about 2 miles. I take the occasional rest using the seat which is a bonus. The design and finish o…

Subscribe to our newsletter!