200 Lumen Trionic LED Front Light

This manual both shows how you attach the LED light on a Walker (left column below) and also how you attach it on a Veloped (right column below).

In the left-hand photo, A shows the holder attachment parts for a Walker (2 screws + 2 washers). B shows the holder attachment parts for a Veloped (1 screw + 1 knurled nut + 1 nut).

200 Lumen Trionic LED Front Light

Attaching the Light Holder

Instructions for a Walker

Of the two rubber straps included,choose the one with a 10-degree angled light attachment section.
A1. Of the two rubber straps included,choose the one with a 10-degree angled light attachment section.
Push the light into the slot of the strap until it snaps in place.
A2. Push the light into the slot of the strap until it snaps in place.
Attach the light to the Walker, either on the semi-vertical frame tube just below the height adjustment quick-release lever, or on the black semi-vertical grip tube.
A3. Attach the light to the Walker, either on the semi-vertical frame tube just below the height adjustment quick-release lever, or on the black semi-vertical grip tube.
Pull the strap tight and fix it with the plastic hook.
A4. Pull the strap tight and fix it with the plastic hook.

Instructions for a Veloped

Of the two rubber straps included, choose the one with a 0-degree angled light attachment section.
A1. Of the two rubber straps included, choose the one with a 0-degree angled light attachment section.
Push the light into the slot of the strap until it snaps in place.
B2. Push the light into the slot of the strap until it snaps in place.
Attach the light to the Veloped, preferably the right or left of the hinge on the U-shaped grip bar. Pull the strap tight and fix it with the plastic hook.
B3. Attach the light to the Veloped, preferably the right or left of the hinge on the U-shaped grip bar. Pull the strap tight and fix it with the plastic hook.
Pull the strap tight and fix it with the plastic hook.
B4. Pull the strap tight and fix it with the plastic hook.

Instructions for Use

The package contains

Caution

It is normal for the battery to reach a high temperature (up to 104°F / 40°C) during charging due to chemical reactions within the battery. The battery may also become warm if it is not fully drained before charging.

Several factors can affect the battery's lifespan, including the type of cell, usage strain, maintenance routine, temperature, and the number of charge cycles. Generally, a higher battery capacity results in a longer operation time.

The battery capacity may decrease to approximately 80% of its original capacity after 300–500 charge/discharge cycles. With proper care, the battery can have a lifespan of up to 3 years.

Water resistant is for rain water only. Do not submerge the bat- tery or the whole light into water when cleaning. Clean the light with a soft damp cloth when needed.

Battery Performance

Battery performance is significantly affected by temperature variations:

Low Temperature: At 0°C, capacity decreases by 5–10%, reducing operation time by 50%. At -20°C, capacity drops by 30%, potentially shortening operation time by 70%. Performance returns to normal when the temperature rises to 20°C.

Self-Discharge Rate: At room temperature, the battery loses about 1% of its capacity per day. When stored at 40°C, the self-discharge rate increases, leading to a loss of approximately 5% of capacity per day.

To maintain optimal battery performance, avoid exposing it to extreme temperatures and store it in a cool, dry place.

If you do not use the battery for a long time be sure to recharge the battery every 3 months.

How to charge the battery

  1. Find the charging place at the bottom of the light.
  2. Lift the rubber cover to access the charging port.
  3. Plug the USB-cable into your USB-charger.
  4. Plug the charging cable into the light's charging port.
  5. The indicator shows red during charging.

The charging indicator turns green when fully charged.

Attention: Use the original supplied USB-cable to charge the battery. Unplug the charging cable once the battery is fully charged.
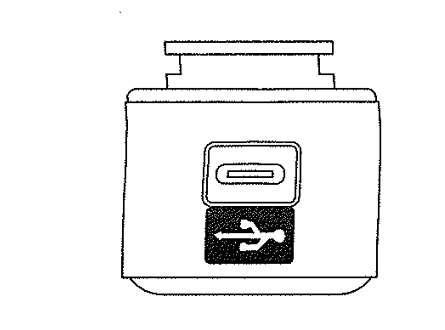
How to charge the battery

How to operate the light

Press and hold the switch for 2 seconds to turn the light on or off. Click once to cycle through modes.

Safe Mode

When the battery is low, the light will automatically switch to a 5-lumen steady mode, providing an additional 30 minutes of operation.

Product Reviews    

  • Mrs T…

    Meets my needs for support when walking. Very pleased with it. Especially useful over gravel surfaces…

  • I bought the Walker after the Veloped…

    After careful consideration, I bought the Walker because I am no longer able to go off-road (I had the Trionic Veloped before).
    I was already familiar with the tyres.
    I have been using the Walker for several weeks now and I must say that I have bee…

  • Mr Alan Clarke…

    Walking is a prime requirement for good health, even when you have a disability. The Trionic Walker 12er is allowing me to traverse walkable surfaces with ease, a situation that my previous, very good-quality walker, could not achieve.…

  • Walker rain cover…

    Essential piece needed to keep items placed in the basket dry when needed.…

    Walker Rain Cover
    by Terence Jones
  • Walker 14 Simply great…

    After 10 years on a Veloped, I have now switched to the Walker. It's easier to transport in the car. As expected, it was a very good decision, I can go anywhere with it, whether on cobblestones, fields or forest paths, it's pure joy! I'll still be u…

  • Glad I bought it!…

    I am very pleased with my Veloped walker. It is easy to walk with it in the woods and I am able now to walk places I could not walk before. Very happy with my purchase.
    Barry Szymanski
    Brookfield, Wisconsin…

  • Life-Changing…

    I bought this for my 82 yr old mother. She loved to walk in the countryside and on wooded paths, but concern about balance had really slowed her down and she complained she could only walk 1 mile and needed to take breaks. I gave her the Veloped as…

  • Most life-changing piece of equipment I've ever bought!…

    I suffered a severe spinal injury in February, 2009, just slipping on an icy path.
    Overnight, I went from an independent, hard-working, active 43year-old to having to be hospitalised for a month, bed-ridden for 3 months, and convalescing with kind f…

  • Schwalbe tube 14”…

    Goods received and installed in the shortest possible time. Everything is perfect again.…

    Schwalbe Tube 14 inch
    by Josef Koller

Subscribe to our newsletter!

"> ?>